
I always wanted a Wii when I was in elementary school at the height of its popularity, but until finally getting a Switch in the pandemic all of my gaming was done on a PC or a handheld. With the busted Wii sitting in the basement I knew it was only a matter of time until I set it up to enjoy all of the fun I missed out on. I installed homebrew following the excellent instructions on the Wii Hacks Guide to circumvent the faulty disc drive. The sensor bar I ordered worked fine for about a week, but that was all it had in it.
Troubleshooting
I took a look at the sensor bar with my phone camera to see the IR emitters and found that only one side was still emitting IR. I popped the case open to discover a dead-simple circuit board with a major and easily remedied flaw. Take a look at the schematic I drew up and see if you can spot the issue.
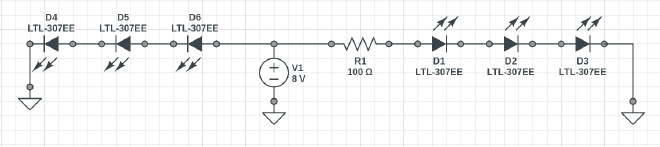
If you took one look at it and asked “why is there only one resistor?” you’d be on track. Yes, this PCB was designed with a current-limiting resistor, but only for half of the LEDs. I asked the seller for a replacement, but I knew that another one would just burn out in the exact same way. However, with how simple the circuitry inside was I figured I could bodge in a resistor for the other three LEDs and have a perfectly functional sensor bar.
Repair
When the replacement arrived I had all I needed to add a resistor to the other half of the LEDs. I desoldered the 100Ω resistor from the donor PCB (not a resistor value I had lying around) and then started work on the new PCB. I used a hobby knife to sever the ground trace on the side without the resistor, and then scraped away the solder mask on either side of the cut trace. Then I applied some solder to the newly exposed copper and soldered the extra resistor in place. I checked my connections with the multimeter to ensure I hadn’t left a short between the resistor legs and snapped the case back together.

Conclusion
I wouldn’t recommend getting one of these crummy replacement sensor bars, but I’m glad I was able to make one working one out of two faulty ones. It was tricky getting the solder mask off the board without scraping away the tiny copper layer so even this repair isn’t a great fix, but for reviving a barely-working Wii it’s done the job with minimal investment.
Also I just want to mention the Pinecil soldering iron I used for this project as a really excellent low-cost soldering iron that can run on almost any power source and heats up in seconds. Check it out at pine64.com.